Gifting family memories

Turn home videos and vintage family photos into modern-day digital files that can be viewed on TVs, computers, and devices! Host a holiday viewing party and reminisce with the entire family!


Digitize your analog memories are safely preserved long-term.
GIFTING TIP: Get digital copies for grandparents, parents, siblings, cousins and your own children. Additional copies of your files are extremely affordable and great for gift giving!
Surprise your family with this meaningful gift! We can digitize nearly any analog media type including photographs, VHS tapes, home movie reels, slides, negatives, documents, scrapbook pages and so much more!
IMPORTANT: Plan ahead for this meaningful gift idea! We need a few weeks to complete this service in time for the holidays!
KEEP YOUR MEMORIES SAFE + LOCAL!
Never ship away your precious memories and irreplaceable home movies; because it’s just too risky! Use a local professional photo + video archiving expert for the best possible result.
STOP-IN OR SCHEDULE AN APPOINTMENT!
Collaborate with a professional consultant, in-store or virtually, to discuss your project!

Homepage Featured Products

a:8:{s:8:”location”;a:2:{i:0;a:1:{i:0;a:3:{s:5:”param”;s:4:”page”;s:8:”operator”;s:2:”==”;s:5:”value”;s:5:”14373″;}}i:1;a:1:{i:0;a:3:{s:5:”param”;s:4:”page”;s:8:”operator”;s:2:”==”;s:5:”value”;s:5:”22762″;}}}s:8:”position”;s:6:”normal”;s:5:”style”;s:7:”default”;s:15:”label_placement”;s:3:”top”;s:21:”instruction_placement”;s:5:”label”;s:14:”hide_on_screen”;s:0:””;s:11:”description”;s:0:””;s:8:”modified”;i:1631118026;}

Archiving Best Practices


Does this sound familiar? “I have photos on a bunch of old CDs, thumb drives, external hard drives, in albums and then there is my Dropbox, Google Photos, and maybe I’ve backed up to iCloud…help, I am overwhelmed!” Before you can start to organize your photos, you have to get them ALL into one place. During week one we will focus on gathering your photos.
Even if you aren’t ready to physically gather them, making a list is a useful first step, and you’ll be more prepared when the time is right to embark on the organizing.
Locate all your photos, slides + videos.
Let’s start with a list of all the places you are storing your printed photos and slides. Include photo albums, framed photos, photos in drawers or boxes or closets, or even storage units. A written list of locations will serve as a checklist when you gather them.
Make a list of all the places you have digital photos. Include old phones, computers, memory cards, and CDs/DVDs. Add usernames and passwords to photo websites where you’ve uploaded pictures.
Home movies should be part of what you’re saving! Make a list of the types you have (Super 8, VHS tapes, camcorder tapes, etc.) so you can make a plan for converting them to digital.
Ask family members!
Get the family involved in tracking down your photos. Ask relatives where their photos are and make a plan to include them in your photo organizing project.
Estimate.
How many photos do you have: 10,000 or 100,000? Knowing the number helps you plan the scope of the project. A shoebox = 600 – 800 photos; 1 GB = about 560 JPGS; the average photo album = 200 photos.
Be selective. Keep only the best of the best!
Are you finding lots of duplicates as you go through your photos? Toss or delete doubles, blurry shots, and most scenery-only photos. Edit your collection down to a manageable size! You may end up getting rid of 50% or more.

Plan for the digitizing process.
You’ve found your photos, but now what? You need a plan. This week, we’ll explore creating a photo legacy by understanding what’s most important to you. What are your photo goals and what would success look like? Then strategize a plan to digitize and back up your photos.
Even if you’re not ready to do the actual organizing, thinking through these decisions about your photo legacy means you’ll be prepared whenever the time is right to start.
Digitize + Back up
The best backup for your printed photos is to scan them by sending them to a trusted local archiving expert. Don’t risk loss, damage or theft of your precious memories by sending them away to a big box online service.

Next Steps
You’ve found your photos, have a plan, and know the stories. Now it’s time to share. The options for printing photos are endless, from framed prints and photo gifts to photo books. Online galleries make it easy to share digitally. Look for ideas to bring your photos back to life by getting them into your everyday life.
Even without starting to organize your whole collection, it’s easy to bring photos back into your life…choose recent favorites from your phone and get creative!
Plan ahead for holiday giving
Get a head start on your gift planning. Digitized family moments is an excellent gift idea for anyone in your family. Surprise family members with a digitized collection of memorabilia!

Slider Settings

a:7:{s:8:”location”;a:1:{i:0;a:1:{i:0;a:3:{s:5:”param”;s:9:”post_type”;s:8:”operator”;s:2:”==”;s:5:”value”;s:10:”pr_sliders”;}}}s:8:”position”;s:15:”acf_after_title”;s:5:”style”;s:7:”default”;s:15:”label_placement”;s:3:”top”;s:21:”instruction_placement”;s:5:”label”;s:14:”hide_on_screen”;s:0:””;s:11:”description”;s:0:””;}

How to discover the shutterbug inside a six-year-old

How to discover the shutterbug inside a six-year-old.

How to discover the shutterbug inside a six-year-old. Like most grade school aged children, mine own tablets and can swipe my phone faster than a New York City pickpocket. But they rarely use the devices’ cameras. The most recent photo in either child’s camera roll? A series of 38 selfies with a blurry dog-looking thing from over four months ago. Other parents I’ve surveyed tell me this evidence is typical. We assume they haven’t yet developed an interest in photography. When they do, the device with a camera is ready and waiting.

But if you’ve ever handed an actual camera to a kindergartner, for example, you know there’s more to it. And the older the camera, the better. One with a viewfinder and no screen really gets the gears turning. After they realize what it is (and that there are no games on it), the purpose sinks in. They discover a different tool that invokes a whole different curiosity.

Here’s how I spawned the shutterbug inside a six-year-old boy. I’d keep an old digital camera handy and anytime we left the house, I’d set it in the back seat. He couldn’t not pick it up and within a couple weeks he was taking it out of the house of his own accord. Sure, that was usually when his other device was off limits, but I say any interest counts. Sometimes, he’d take 38 pics of the seatback out of boredom. But often he’d take real pictures. And he got better fast. I’d watch as he would stop, compose, capture, and retake until he found an angle he liked. The results were far more thoughtful than anything he’d shot with an iPad. I didn’t try to explain the menu or functions unless he asked so he discovered most on his own and now frequently uses exposure compensation to improve a shot.

Since then, I’ve let him wrangle my DSLR, complete with a gigantic vertical grip attached. It’s obviously cumbersome but he knows what he’s doing and, more importantly, why he’s doing it. The pictures he takes are important to him and although most are viewed on his device and shared between family, a select few have found fame on his older brother’s blog. I think we’ll venture into printing soon.

I’m not surprised that he’s become a pretty good photographer. I’m surprised that maybe he already was. Sometimes all it takes is the right tool.

Fb/Insta

How to discover the shutterbug inside a six-year-old.

#kidsneedcameras #youngphotog #camerakiddo

Five Ways To Fauxlaroid

Five Ways To Fauxlaroid

Five Ways To Fauxlaroid

Mine was a Polaroid® One-Step. A black plastic behemoth with a shutter button the size of my whole thumb. And that was the smallest part. Things were big in the ‘90s but this whole thing was obtuse compared to the refined 35mm cameras it sat next to. And while 35mm counterparts were capturing sleek, wide images with a 3:2 ratio that could yield beautiful color prints of all sizes, this thing would spit out one squarish frame of mud. But then came the magic. The print would develop in my hand. Checkmate. That’s how Polaroid cemented itself in our hearts as instantly as it captured each emotion. For all the science behind the technology, it was the magic that we’d come to love.

If you didn’t go for Polaroid back in the day, don’t worry. You can rediscover the format or recreate the iconic look easily.

First, there’s The Impossible Project, a movement to resurrect the Polaroid film factory and sell refurbished Polaroid cameras to an enamored following. You can buy Impossible® film and cameras manufactured to near-original specs right now.

There’s also a new original Polaroid from Polaroid Originals® (these company names are uncanny). The OneStep2® is a slightly more compact, an updated version of the iconic OneStep that still uses the familiar 600-type film. No frills, all retro.

And, while not Polaroids by design, the Fujifilm® Instax® line has successfully cornered the instant market since its introduction a decade ago. There are original, square, and mini formats, a complete line of cameras, and an instant printer to liberate images from your device.

Speaking of devices, did you know there’s a Polaroid smartphone? It doesn’t make polaroid pictures so we won’t get into it. But for any device, there is, of course, an app for that. The Polaroid® Instant Mobile App lets you snap or import a pic and apply the timeless Polaroid format complete with captions scribbled on the border. Available for Android, iOS, and Mac. Unlike actual Polaroids, you can share as many copies as you’d like.

Of course, for the trillions upon trillions of digital images captured via other means that will never know the familiar frame of the beloved Polaroid, we call upon the magic of Photoshop. Easy as:

  1. Open image
  2. Crop to 3×3”
  3. Resize canvas to 3.5×3.5” (center).
  4. Resize canvas again to 3.5×4” (add to bottom).

Actual dimensions, for you purists: https://support.polaroidoriginals.com/hc/en-us/articles/115012363647-Polaroid-Originals-photo-dimensions

A batch action for, for you power users, (credit: Maximilian Janicke via Deviant Art): https://rawimage.deviantart.com/art/Polaroid-GENERATOR-V2-118854065

Finally, for the absolute easiest way to fauxlaroid any image, order polaroid-style prints from any device online or in-store with us! That’s right, any selfie or mobile snapshot can be output with the same iconic white border just like the real thing.

#instantlove #instantstyle #polaroid #fauxlaroid

why metadata matters for preserving old family photos

Why Metadata Matters for Preserving Old Family Photos

Why Metadata Matters for Preserving Old Family Photos

Have you ever discovered a loved one’s handwritten notes on the back of an old photo? My grandmother often noted her memories, in beautiful script, on the back of black-and-white snapshots. Although she didn’t know it when she was writing, she was creating metadata about our family pictures. Metadata is one of those technical terms you may hear people talk about from time to time. It’s just a fancy word for memories. And just like your grandmother’s notes on the back of old photos, metadata is how your grandchildren will learn about you and your legacy. Even though it may sound like technical jargon, metadata is actually super simple and key to preserving family history. Let’s dive in and learn why metadata matters for preserving old family photos.

So, what is metadata anyway?

Metadata is data about data. In this case, the data is simply describing photographs. Metadata provides key information about the photos, which is useful because it adds context and backstory. Metadata also makes finding photos faster, even years down the road when most of the people depicted in the photos are no longer living.

If you carefully add metadata to your photos now, future generations will be able to locate and enjoy photos. Metadata makes your pictures searchable. No more sifting through folders, hard drives and emails when you’re in a rush to find a photo to send to a family member! When it comes to search and rescue, metadata is like the lifeboat of family history! Without it, your family photos may become anonymous artifacts.

 How do I add metadata to my family photos?

After you’ve digitized (scanned) your family photos, you can begin adding metadata to the digital files. Remember, scanning doesn’t actually archive information about your photo. Have you scanned dozens of family pictures, but never actually attached any information to the files? Don’t worry, lots of people make this mistake. The good news is, this is an easy-fix! You just need to add some basic info to your photos. That info is called metadata. The metadata you add will be embedded in the JPEG or TIFF file, so the information actually sticks with the photos!

Peter Krogh, the leading authority on digital asset management for pro photographers, says it’s easier to think of metadata as tags. Many of us are already familiar with tags; we use them daily on social media. They’re manageable, logical and extremely powerful.

There are specific standards for image metadata, which have been developed by news organizations over the last 25 years. This standard is called IPTC. It defines a series of text-based fields that standardize the way different aspects of a photo are described. While there are many fields in the IPTC standard, family historians only need to focus on three:

1) Headline: a short phrase that describes the photo. For example, “Ed and Joe fish at Grandaddy’s Farm” would be a great headline for a family photo.

2) Caption (description): This is a sentence or short paragraph describing the photo. The Associated Press has a specific format for writing captions so that basic information is answered about every photo. While you don’t have to write captions to a strict standard, it’s smart to add as much info as you possible into the caption so details are preserved. As you’re writing captions, think like a reporter. Your caption should answer these basic questions, “Who? What? When? Where? Why? And How?” For example, you should include first and last names of people pictured, what they are doing, a date or approximate date, location, the reason for what they are doing.

3) Keywords: These are like breadcrumbs; they enable searchers to find photos faster. Keywords are words or short phrases that describe the photo. Think of what you would type into Google to find the photo. These are the keywords you should apply. You can use names of people pictured as keywords, locations, activities pictured, events, and other descriptors. It’s also good to standardize a list of keywords to apply to photos so you use the exact same terms to refer to the same concept in different photos. This is called a controlled vocabulary, which sounds like jargon, but is just a way for you to be consistent when describing photographs.

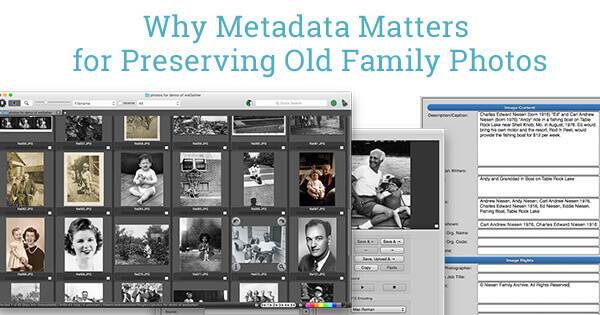
An easy way to add these vital pieces of information to photos is by right-clicking on its thumbnail. But if you’d like to take it a step farther and archive your photos like a pro, you should consider investing in some software that will make metadata a breeze! For my own family archives, I rely on Photomechanic for adding metadata to photos. Here’s a helpful screenshot of the metadata fields within Photomechanic. With a few fast tutorials, you’ll be a whiz at adding metadata to your photos.

Tip for mobile device photos: The simplest way to use PhotoMechanic to manage the library of images you create with mobile devices is to utilize Google Photos’ cloud-based storage service. Google Photos will synchronize the photos from your phones and tablets via mobile apps you install on your Android or Apple devices, and then use a sync app you can download for your computer. By synchronizing mobile photos up to Google Photos, and then down to your computer, you will have the files locally and can add metadata using Photo Mechanic.

Unless you add metadata to your image files (whether they are from your iPhone or scanned from an original print), you don’t have permanent information attached to your photos. And that’s tragic for future generations who want to get to know their ancestors! So take steps now to add as much metadata to your family photos as you can. After all, future generations of loved ones will get to know you through the information you add now.

Host an Open House

Showcase your business with an annual open house

It’s time to put the spotlight on your business. Accomplishing your goals is no longer enough. It’s time to show off all of that hard work and build support within your own local community. Showcase everything that you do, plus what is new and exciting about your business. An open house should be your annual spring board for the holidays or busy season, pushing you towards an early deadline for implementation and team training on all new initiatives.

IMAGINE – all of your new initiatives implemented, your location in pristine condition, your team trained and your community informed BEFORE your busiest selling season! Think of the amazing customer experience that you can provide when everything is already in place and customers can be your only focus. 

Quick tips for hosting an effective open house:

  • Involve your full team. Keeping them engaged and motivated with a level of responsibility and accountability is the key to being highly successful.
  • Start planning early and stay organized. Start planning your event at least 60 days before it takes place. Create a calendar for your team and a detailed checklist. Breaking the event down into small, simple daily tasks that are assigned to specific team members will make for successful execution. Keep the calendar/checklist in a centrally located area so that all team members can track the progress.
  • Establish a reasonable budget.
  • Partner with other local businesses. To highlight members of your community and save on expenses, ask local businesses to be the vendors for your event. Offer them promotional opportunities in trade for free or discounted services. Make your planning process easier by relying upon their expertise. Arrange for these services as early as possible in the planning process. What do they require for set up? What do you need to provide? How early will they need to set up? Ask them to preview the space. Confirm each partner’s participation one week prior to the event.
  • Set the scene. Look at your business from the eyes of a new customer, from the moment he or she spots your location to the time that he or she is leaving your area. Start with curb appeal, then focus your efforts on your customer space and private work areas. Do not neglect your bathroom! Pull weeds; paint curbs; clean windows and refresh window displays. Organize interior displays and backroom supplies. Thoroughly clean every inch of every area, inside and outside. This is the time to invest in carpet cleaning, and other commercial cleaning services. Repair and replace dated, damaged or unappealing items. A fresh coat of paint can work wonders! What needs to be purchased? What can you create in-house? How much will this cost?
  • Brainstorm a locally inspired theme. Celebrate your local culture and infuse seasonal elements. Brainstorm ways to communicate to visitors that you are opening up your family, home and business up to their family, home and business. What décor can appropriately accomplish these themes? Is there another local event, holiday or season that you could represent?
  • Update all samples and displays. Update all dated and worn samples. Create samples of all new products and services that you will be launching. Feature local images by community artists and your customers on all samples to keep with the theme and the neighborhood atmosphere. Update your digital signage feed. Update and print brochures, rack cards, newsletter, stuffer and calendar of events. These can be placed anywhere and everywhere during the event, as well as inside gift bags.
  • Create a unique guest experience. Plan out every moment of the attendee experience. How will traffic flow through the event? Where will food, beverage and entertainment be placed? What will enhance the guest experience and help to make it seamless?
  • Require “all hands on deck” for maximum success. All team members should commit to being at your event prior to set up until after cleanup is complete. Have custom name tags created and worn. Consider also having team shirts. These could be fun and themed. It is important for guests to be able to easily pick out team members. If you are adhering to a more stylized theme, consider hats or costumes. Offer meals, snacks and hydration to your team throughout the day. Take turns taking breaks and eating, one at a time. Treat your team to a celebration within one week following the event. Celebrate your success and discuss your next event!
  • Be the host(ess) with the most(ess)! Do not schedule yourself to do anything but be the host/hostess. Socialize with your guests. Personally acknowledge and thank your partners and special invited guests. Your sole responsibility is to create, foster and nurture relationships with the members of your community on behalf of your business.

Check out the promo video for our next brand launch open house for The Print Refinery: https://youtu.be/n6uaKu1bee0.

Neighborhood Expert

Be the Local Expert

Are you positioned as the local expert in your market? Being your neighborhood expert means delivering a consistent, high quality experience for all customers. By providing coaching and consulting services to your customers, you become “the place to go” for _____. You build trust and customers are willing to pay extra for that level of expert service. Offer classes to boost this image further, creating a community around your expertise. Customers are more likely to return to your store again and again, and to refer their family/friends/colleagues, when they are learning new skills.

Try not to single out just one person as the expert on your team. You don’t want the owner or manager to be in such high demand that they don’t have time to focus on strategic business growth. Celebrate the expertise and certifications of all of your team members. Promote individual team members on your website and via social media for maximum impact.

To learn more about The Print Refinery or to join one of our teams, visit http://theprintrefinery.com/.